ELISA / Assay Kit
ELISA is the leading method for quantifying target protein levels in a sample.
FUJIFILM Wako provides many assay kits for measuring metabolites, pharmacological effects, and drug safety, including LabAssayTM series kits to measure biochemical test items for research purposes, which have been used in over 1,000 papers.
Product Line-up
Trouble shooting for Shibayagi's Kits
Coloration in general
| Troubles | Possible Causes and Measures |
|---|---|
| Poor or no coloration after the last step. | 1) The standard or samples might not be added. 2) Reagents necessary for coloration shown below might not be added. 1 Biotin-labeled antibody
2 HRP-conjugated avidin 3 TMB 3) Wrong reagents related to coloration might have been added. Wrong dilution of biotin-labeled antibody or HRP-avidin conjugate. 4) Contamination of enzyme inhibitor(s). Bottles or vessels used for dilution of HRP-avidin conjugate might have been contaminated with sodium azide (NaN3) or fluoride, and inactivates HRP.. Especially, NaN3 is very often added to various buffer solutions and contaminates vessels. So, please, be careful. 5) Influence of the temperature under which the kits had been stored. Freezing and thawing might cause denaturation of HRP-avidin conjugate. 6) Excessive hard washing of the well plate. Especially, in using an automatic plate washer, if you set the washing power to give a strong water pressure, it may result in washing off of the antibody coated on the well. The machine should be adjusted to give the best coloration. The washing mode should be set at “plate mode”. The proper flow rate is 5-25ml/min though it differs depending on the nozzle diameter. Also, in manual washing using a jet bottle, be careful not to press the bottle strongly. Pour the washing buffer gently onto the well. We recommend you to increase frequency of the gentle washing rather than strong flashing for better and safe washing. 7) Addition of TMB solution soon after taking out from arefrigerator might cause poor coloration owing to low temperature. All the reagent solutions for ELISA should be used after fully warmed up to room temperature (20-25°C) |
| Satisfactory absorbance was not obtained by the densitometer though the coloration is apparent to the eye. | The plate-reader might not be adjusted to the correct wavelength (450nm for TMB). -> Check the reader and adjust the wavelength. In the case of a filter-type plate-reader, check the wavelength of the filter, and replace for right one when wrong. |
| The wells showed coloration before the addition of reaction stopper. | The chromogenic substrate TMB used in our assay kits shows bluish color when oxidized by HRP at the neutral pH, and turns to yellow-orange color under an acidic pH caused by addition of sulfuric acid (the reaction stopper). This color absorbs the light of 450nm wave length. So, the coloration before the addition of the reaction stopper is natural. Coloration After enzyme action After reaction-stopper  |
| All the wells showed high coloration. | TMB solution might have been oxidized by some agents. |
Standard curve
| Troubles | Possible Causes and Measures |
|---|---|
| Flat standard curve. All the wells for the standard curve showed very low coloration, though sample wells gave good coloration. | Standard solutions are not added. In the dilution of original standard solution, other solution than the right original standard solution might be used, or simply the original standard solution was forgotten. |
| Flat standard curve. All the wells for both the standard curve and samples showed very low coloration. | Please, read the section of coloration in general. |
| Absorbance of the blank (0-conc.) was higher than that of the lowest standard. | 1) Possibility of edge effect. Wells locating at the edge (rows 1 and 12, and lines A and H) of a well-plate are liable to be influenced by heat from outside circumstances, and the reactions in those wells may proceed more rapidly or more slowly than in other inside wells. We call this phenomenon "edge effect" . Sometimes, a well-plate, kit reagents, and samples which have been stored in a refrigerator are used soon after taken out while they are still cooler than room temperature, wells at the plate edge would be warmed up than other inside wells, causing reactions to proceed rapidly. In winter those wells may be heated by warm air derived from a heater and a radiant heat from a stove or a steam heater. As a result, the absorbance wells along the edge may be higher than those of low standards, or in duplicated standard wells those wells located along the edge of the plate always give higher absorbance than corresponding inside wells. To minimize the edge effect, 1) get back well-plates, reagents, and sample fully to the room temperature, 2) avoid working near heat source and away from the outlet of air conditioner, and 3) cover the well-plate with a transparent or semi-transparent plastic box twice bigger than the plate during incubation process. The wells used for blank are in most cases located at A1-A2 or H1-H2 (in duplicated standard wells). And are most liable to be influenced by the edge effect. One possible cause of the edge effect on such blank wells may be heat from the fingers which keep holding the well-plate during the addition of TMB solution. Please, do not hold the well-plate. To avoid the holding, we recommend the use of "non-slip sheet" ...A very cheap and thin rubber sheet generally used under a doormat. In our laboratory, we cut such sheet to a size a little bigger than a well-plate, then put a plate on it. By doing this the plate will never move while pipetting without holding. If you do not like to use non-slip sheet, just hold the plate at a side with a fingertip to minimize the heat transfer. 2) Possibility of dried-up well The long interval between the end of washing buffer removal and addition of the reagent solution of the next step may cause the dryness of the wells owing to the air stream from the air conditioner. Please, check such possibility and try to make the interval as short as possible. 3) Wrong dilution of reagent supplied as concentrated solution. Please, check the dilution procedure. 4) Incomplete washing and carry-over. If you use an automatic plate washer, check the aspiration and washing volumes, and the amount of solution left in the well. The washing mode should be set at “plate mode”. The proper flow rate is 5-25ml/min though it differs depending on the nozzle diameter. Also, in manual washing using a jet bottle, cut the tip of the nozzle a little bit to enlarge the diameter of the nozzle tip. By doing this, the water stream will be more gentle. We also recommend you to increase repeating of washing. The repeating times of the washing can be increased up to twice as much as indicated in the instruction paper (if the instruction paper says 4 times, you can wash 4 ~ 8 times). Increased repetition will surely decrease the absorbance of the zero standard. In order to avoid carry-over, every addition of the reagent solution and washing buffer (including standard solutions) should start from the blank wells to higher standard wells. Especially in the first addition of washing buffer after the reaction between the coated antibody and standard/sample solution, we recommend you to use a repeating dispenser set at 250μl to add washing buffer. In the second washing downward, a flashing bottle with a nozzle will do. 5) Possibility of excessive reaction Incubation of the well-plate must be carried out at the right temperature for the right period indicated in the instruction paper. |
| Absorbance of the standard decreased when standard concentration increased. | Order of the standard solutions might be reversed. |
| The standard curve obtained was not smooth. | There might be some mistake in the serial dilution of the original standard solution. Pay attention to volumes of standard and buffer solutions and enough mixing. For beginners, we recommend to use serial dilution with the interval of 1/2. This will helpful in avoiding dilution mistake. |
| The standard curve obtained moved toward right than that shown in the instruction paper. | 1) The standard preparation might have been denatured. 2) The wrong initial dilution of the original standard solution. 3) The vortex mixing in the dilution of original standard solution might not be enough, and the mixture might not be homogeneous. 4) The reaction period might not be enough by any mistake. |
| In duplicated standards, those wells located along the edge of the plate always gave higher absorbance than inner wells. | This may due to "edge effect" . Please, read above section describing the edge effect. |
Samples
| Troubles | Possible Causes and Measures |
|---|---|
| Assay values were not obtained because samples gave lower absorbance than that of blank though the standard curve seemed to be normal. | 1) In case NaF-coated blood-sampling tubes are used, or NaN3 is added to assay sample as a preservative, they may influence the enzyme action of HRP though wells are washed before the addition of HRP-conjugate. The best way is not to use NaF and NaN3. The preservative NaN3 can be replaced with ProClin 300 (final concentration, 0.02-0.01%). In some kits, heparin is harmful for antigen-antibody reaction. We rather recommend serum than plasma. 2) Inactivation of the substance to be measured. Inactivation may happen during storage of samples. Blood samples should be snap-frozen and stored at lower than -35oC, preferably ultra-low temperature like -60oC. Addition of a kallicrein inhibitor like aprotinin (100~500KIU/ml) is recommended. We suggest examining the best procedure toavoid inactivation for your laboratory. 3) In order to check the presence of any interfering substances in blood samples, please, try a dilution test where sample is assayed after serial dilution, and see if the "assay value x dilution factor" gives always same value. 4) Low assay values owing to hemolysis. A slight hemolysis will not influence on assay value, however, too much hemolysis (hemoglobin concentration more than 40mg/ml) may interfere significantly with the assay reaction. 5) Low assay values due to pH of serum/plasma samples. Blood samples like serum or plasma easily lose carbon dioxide soon after preparation, and pH will become alkaline (> pH 8) which may interfere with antigen-antibody binding. 6) Blood samples obtained from animals by heavy ether anesthesia contain ether which may influence on assay reaction. |
| Lower assay values with normal animal samples compared with those obtained with other maker's kit, or those appeared in previous reports. | This may be due to the difference in purity of the standard preparations. If the standard preparation is of lower purity, assay values will be high, and highly pure standard preparation will give lower assay values, when the assay values are expressed by the weight of the standard preparation employed. If the values are expressed as the international standard unit (or weight) the assay values will remain similar range. This phenomenon very often happened if you check various reports published in the past. |
| Lower assay values with normal animal samples compared with those obtained in the previous assays using the same kit. | 1) The substance in the sample might have been denatured during the storage. 2) There might be some seasonal or diurnal changes in the blood level of the substance to be measured. 3) We recommend the use of positive control samples which have been prepared and divided into many aliquots, and stored at ultra-low temperature. One aliquot is measured as a sample in every assay. This will be helpful in quality control of assays. |
| Higher assay values with normal animal samples compared with those obtained with other maker's kit, or those appeared in previous reports. | 1) This might be due to the same reason stated above, i.e. difference in the purity of the standard preparation used. 2) The standard preparation in the present assay might be inactivated by denaturation. Please, check the standard curve if the curve has not shifted to the right. 3) There might be some seasonal or diurnal changes in the blood level of the substance to be measured. You can check it by using control samples in each assay. |
| Assay values were not obtained with samples from the tissue or cellar extraction, chromatographic, isoelectric focusing, or electrophoresis. | 1) pH of the sample might be out of the permitted range of the assay (pH 6.5 -8.0). Please, check pH and, if necessary, neutralize by dilution with buffer, or by small volume of acidic or alkaline solution. 2) Contamination with some organic solvents. Organic solvents may interfere with the assay reaction. Please, dilute them with buffer, or remove solvents with nitrogen stream or placing under reduced pressure for same period. Validity of a treatment method should be checked by a recovery test. |
Assay precision (variation)
| Troubles | Possible Causes and Measures |
| Big variation between two wells in duplicated assay was observed. | The major factors making assay variation bigger are heterogeneous proceeding of the reaction, unsuitable pipetting, and heterogeneity of samples. Factors causing heterogeneous proceeding of assay reactions. 1) Scratching the bottom of the well by aspirator tip during aspiration of washing buffer. 2) Scratching the bottom of the well by pipette tip during addition of standards, samples, or reagents. Addition of the reagent solution using a pipette with 8 or 12 tips is not recommended because holding of such pipette in parallel with the well-plate is very difficult and may easily cause scratching. The antibody coated on the bottom of well is not so stable, and may be removed by scratching or hard water jet. The loss of antibody makes heterogeneity among wells. 3) Assay might be started while the well-plate was still cooler than room temperature, and this made the heterogeneity in the temperature among wells, and the edge effect happened. The well-plate and all reagents as well as assay samples which have been stored in a refrigerator, should be set back to room temperature by placing them outside at least for 1.5 hour before starting assay. 4) Air stream, warmer or cooler than room temperature from air conditioner, cooling system of various apparatus including personal computer might influence well-plate temperature. Heat radiation from a stove or instrument also might give the same effect (edge effect). 5) Air stream from air conditioner or other instruments might dry wells. 6) Insufficient removal of washing buffer from the wells might dilute reagent solution added in the following step of the procedure. The washing buffer should be completely removed by striking well plate upside down on folded several sheets of paper towel. Assay variation due to pipetting 1) Variation of pipetting of standard solutions and samples directly caused assay variation. To use proper pipette in proper way is one of the most important points in ELISA. The upper limit of the pipette must be coordinated to the volume of standard or sample. Never use 100μl pipette, for instance, for delivering 5 - 10μl standard or sample solution. Also, it is necessary to check the variation of every pipette with proper interval. 2) There are two methods for the tip-type pipette do not mix up "Pre-wetting method" and "Co-washing method". These methods were described in our website "1. How to Operate Shibayagi's ELISA Kits - An Introduction (Power point)". 3) Temperature of solution to be delivered might influence variation in assay. If solution to be delivered is cooler or warmer than room temperature, the volume of the solution may be smaller or larger than setting, respectively. All the solutions used in assay should have been stayed at room temperature for enough period to get to the room temperature. 4) Choking up of the pipette tip might influence the variation by decreasing the volume to be delivered. If plasma samples are frozen-stored and thawed, there formed fibrin particles which chokes up a pipette tip, interfering with pipetting. Please, check carefully the state of the samples after thawing, and if you find fibrin particles, remove them by any proper way. 5) Big variation would be obtained if the sample is not homogeneous. When serum/plasma samples are stored frozen, please be careful about the freezing method and temperature. Slow freezing causes concentration gradient of protein components, leaving high concentration in the bottom. Also, when thawing thinner part will remain as ice at the top. So, samples should be snap-frozen in a very low temperature obtained by using dry ice-acetone mixture or dry ice-ethanol mixture, and stored under ultralow temperature if possible. After thawing, please, stir the sample well on a vortex mixer. |
Plate seal
| Troubles | Possible Causes and Measures |
|---|---|
| Plate seal could not be removed completely, and some parts remained on the plate. | The seal might be removed soon after the plate was taken out from a refrigerator. The plate seal has been attached to the plate with heat(without any glue). If you try to remove seal from the plate soon after taking out from a refrigerator, it is not easy to remove completely. Please, wait until the plate gets back to the room temperature, at room temperature, the seal is easily peeled off. |
Reagents
| Troubles | Possible Causes and Measures |
|---|---|
| Some crystals were found in the reagent solution. | From the solubility of the components, some crystals might be formed in reagent solution. In such case, please, warm up the solution by placing the bottle in warm water (lower than 37oC) until those crystals are dissolved, then stir the bottle and place it in water of room temperature for some period. |
Important Points in Performing ELISA
Sampling and treatments of samples
Serum or plasma?
In general, we recommend using serum samples. In getting plasma, heparin is most often used as an anti-coagulant at a final concentration of 1.2-12U/ml (10-100μg/ml), however, in some kits, heparin interferes with the reaction, causing concentration-dependent poor assay values. In such case, we recommend to use EDTA (at a maximum final concentration of 1mg/ml). Use of fluoride must be avoided because fluoride ion is a potent inhibitor of peroxidase. Even if wells are washed after the binding reaction to capture antibody a trace amount of remaining fluoride ion may interfere with the enzyme activity.
An important phenomenon with frozen plasma is that an insoluble substance (fibrin) will be formed when thawed. In this case, the sample must be vortexed and centrifuged, then the insoluble cluster flowing in the plasma should be taken out by a thin wire needle sharply bent at an end. If such fibrin remains in the sample, it may clog the tip of a pipette and influences assay variability.
Influence of hemolysis
As an example, the results of a test with rat insulin assay kit are shown below. The test was carried out with n=5. With hemoglobin concentration above 40mg/dl, the assay values are lowered significantly.
| Samples | Hemoglobin concentration (mg/dl) | ||||
| 0 | 10 | 20 | 40 | ||
| 1 | Assay value, ng/ml % | 0.521 100% |
0.533 102% |
0.500 96.0% |
0.456 87.5% |
| 2 | Assay value, ng/ml % | 1.04 100% |
0.998 96% |
0.989 95.1% |
0.925 88.9% |
| 3 | Assay value, ng/ml % | 3.56 100% |
3.35 94.1% |
3.39 95.2% |
2.56 71.9% |
Hemoglobin concentration and sample color
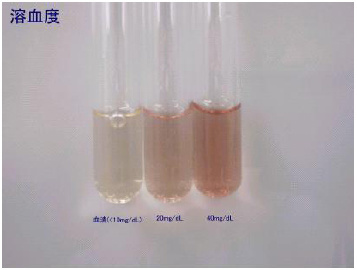
Be careful! Mouse blood is easily hemolysed.
Preservatives
Sodium azide (NaN3) is very often used as a preservative. But better to avoid this substance because it is a potent inhibitor of peroxidase from the similar reason to fluoride ion.
ProClin 300 (at final concentration 0.02-0.01%) may be allowed.
On the other hand, a preservative such as aprotinin(or trasylol), which is a kallikrein inhibitor, is sometimes necessary to protect the substance to be assayed. Aprotinin should be added to serum (plasma) at a final concentration of 100-500KIU/ml.
pH of samples
Serum or plasma, when fresh, shows pH near neutral, however, it very quickly goes to alkaline more than pH 8 by losing CO2. When frozen the solubility of CO2 is reduced, and shows alkaline pH very quickly after thawing. Some substance may be inactivated under alkaline pH. In alkaline pH, the antigen-antibody reaction is interfered.
If the sample is incubation medium, its pH may be also alkaline if buffered with bicarbonate.
So, if the buffering action of assay reagent is weak, the reaction will be influenced by sample pH. Please, check pH of your samples and neutralize them by adding proper neutral buffer if necessary.
Storage temperature and freezing-thawing
Sample storage temperature is better to be lower than -35oC. Ultra-low temperature such as -80oC is recommended for a long-term storage.
A long storage in a home freezer is not recommended because the sample is frozen very slowly and the solute may separate from solvent, and is concentrated at to the bottom of the storage tube. This may sometimes cause inactivation.
When samples are frozen and stored, first snap-freeze the sample using dry ice-acetone mixture or dry ice-ethanol, then transfer them into a freezer.
Repeated freezing and thawing is also harmful to the protein, and may cause inactivation.
When samples are taken out from the freezer and thawed, never forget to vortex these samples because the solution after thawing is not homogeneous, and the bottom area contains more solute.
Pipettes
Selection of pipettes
Pipettes for samples and standard solutions are especially important because their precision directly influence the assay precision. When you add samples or standards at a volume of 5 or 10 μl, for example, use a pipette with the maximal setting volume of 5 or 10μl, and never use with the maximum setting volume of 100μl or more. In other words, use volume-matched pipette. If you measure 100μl with maximum 100μl pipette, the precision of the delivery volume is about 1%, however, when you measure 5μl with the same pipette, the precision will be nearly 30%.
With a widely used tip-type pipette, the important factor is the temperature of the solution to be delivered. If the solution temperature is higher than room temperature, it may cause an expansion of the air in the tip and the pipette, thus delivers smaller volume of the solution. On the other hand, colder solution than room temperature causes shrinkage of the air, and delivered volume will be more than setting. If the sample solution is highly viscous, solution attached to the inner wall of the tip would be more than that of thinner solution, so the first delivery volume would be less. The amount of solution attached to the outside of the tip would be also important, and in order to remove this, "touch and go" procedure is necessary.
We do not recommend a multi-channel pipette. We are afraid that it possibly scratches the bottom of wells because of difficulty of holding it in parallel with wells, resulting in removal of antibody coating the surface of the bottom and big variation.
In pipetting reagent solution to be added to all the wells, we recommend a repeating dispenser such as "Eppendorf multipette plus". Using this type of pipette, we can dispense rapidly and are able to save time without scratching the bottom.
How to calculate ELISA assay values by EXCEL
Usually, calculation of the assay value of ELISA is carried out firstly to prepare a standard curve by plotting absorbance on Y-axis against concentration on X-axis, then to estimate assay value from the absorbance of the sample.
EXCEL is really an excellent tool, and it can give X value from Y if GOAL SEEK function is used, however, you have to follow the steps of Goal seek for every absorbance to get X value for Y. So, the ordinary way of preparing a standard curve and calculation of assay value is rather inconvenient in EXCEL.
I suggest a method to calculate assay value by using a reverse standard curve where absorbance on X and concentration on Y.
As in ELISA, the standard curve is nearly linear and excellent fitness is easily obtained by logarithmic transformation of both absorbance and concentration, and because R2 of the 3rd order regression equation is very near to 1 (more than 0.998, mostly), the assay values obtained by normal calculation and by X-Y exchanging method are very close.
We are providing EXCEL templates for these two procedures of calculation. It is of interest to try these two templates and compare. If you feel that the ordinary procedure is inconvenient, you can make it quicker by using macro function, though we will not provide macro procedure for fear of macro-virus.
*Please use this Excel template and judge your assay results on your own responsibility.
Product Line-up
For research use or further manufacturing use only. Not for use in diagnostic procedures.
Product content may differ from the actual image due to minor specification changes etc.
If the revision of product standards and packaging standards has been made, there is a case where the actual product specifications and images are different.